4 Steps To Making Your Car Pics Look As Good As The Professionals'
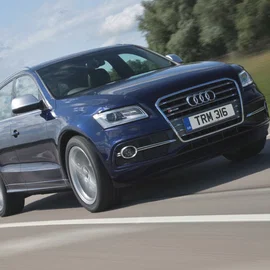
Resident snapper Olgun Kordal spent four hours with me last week shooting the mighty Audi RSQ3 (review coming soon) in an industrial estate in north London. After the shots were taken, Olgun got to work on the edit to stitch multiple images together, alter the backgrounds and tweak the colours. In his own words, here’s the typical editing process of one picture:

Step 1: Import the images
To start the editing process for the image you see above, I begin by importing the images into Photoshop. For this front-on picture I used five images; two for the bodywork of the car and the foreground, and three for the background.
Step 2: Layering
Once all the images are open in Photoshop, I layer them. I layer the background images first using the lighten layer blend mode, which allows only the light parts of the images to shine through. I then layer the two images of the car and make sure they are aligned; I find zooming into the number plate a good way of ensuring this. Again, I use the lighten blend mode.

Step 3: Align images onto backround
Once the images are layered, I then grab the aligned images of the car and place them onto the aligned background images. Here, I go about deleting part of the individual layers I don’t want showing through. For example, on the top layers of the car, some of the back wall is lit by the flash.

Step 4: Fine-tuning
When I’m happy, I go about fine tuning. This involves removing spots and marks. I use the pen tool (your best friend) to select parts of the bodywork I want to exaggerate, using levels. Once the image is clean, I then send it back to Lightroom and do my colour changes using the colour palette to select individual colours and tweak them. Finally, I sharpen the image (a tad!), using noise reduction if needed.

If this has sparked your interest in car photography, or if you simply want to ask Olgun any questions about the edit, then fire away in the comments section where he’ll be on hand to help out with advice and answers. To see more of his work, this is his Facebook page.


Comments